


The simplified right-click menu in Windows 11 no longer offers as many options as before. However, there is a solution to find the old contextual menu.
Throw Windows 11Microsoft has shaken up many of the habits acquired by users who have spent years using Windows 7 and Windows 10. For newcomers, undoubtedly the hardest of these has been the migration of the Start menu, which is now centered by default in the taskbar.
For the most heat-resistant, Microsoft has thought of incorporating an option to choose the location of the said Start menu. So it is possible to replace it to the left of the taskbar, as it was in previous versions of Windows.
Unfortunately, the Redmond company didn’t do that with all the changes made in Windows 11. One of them is particularly annoying: the new right-click context menu no longer displays as many options as usual. Microsoft has already decided to reduce it and simplify the options shown, moving others to the new “Show more options” menu. What used to only require two clicks now takes twice that number.
However, there is a fairly simple solution to implement to restore the display of the old Windows context menu.
How is the legacy contextual menu displayed by default?
1. Create a restore point
The following processing affects the Windows 11 Registry Editor, which is a particularly sensitive component of the operating system, is highly recommended Create a restore point before starting this delicate process.
Thus, in the event of a problem or malfunction, you can restore your computer to the state it was in before the tampering.
2. Open Command Prompt in Administrator Mode
Now click on the menu to start then type poultice using your keyboard. L ‘Command Prompt Windows should appear as the best match. Click on Run as administrator To unlock it with the highest privileges.
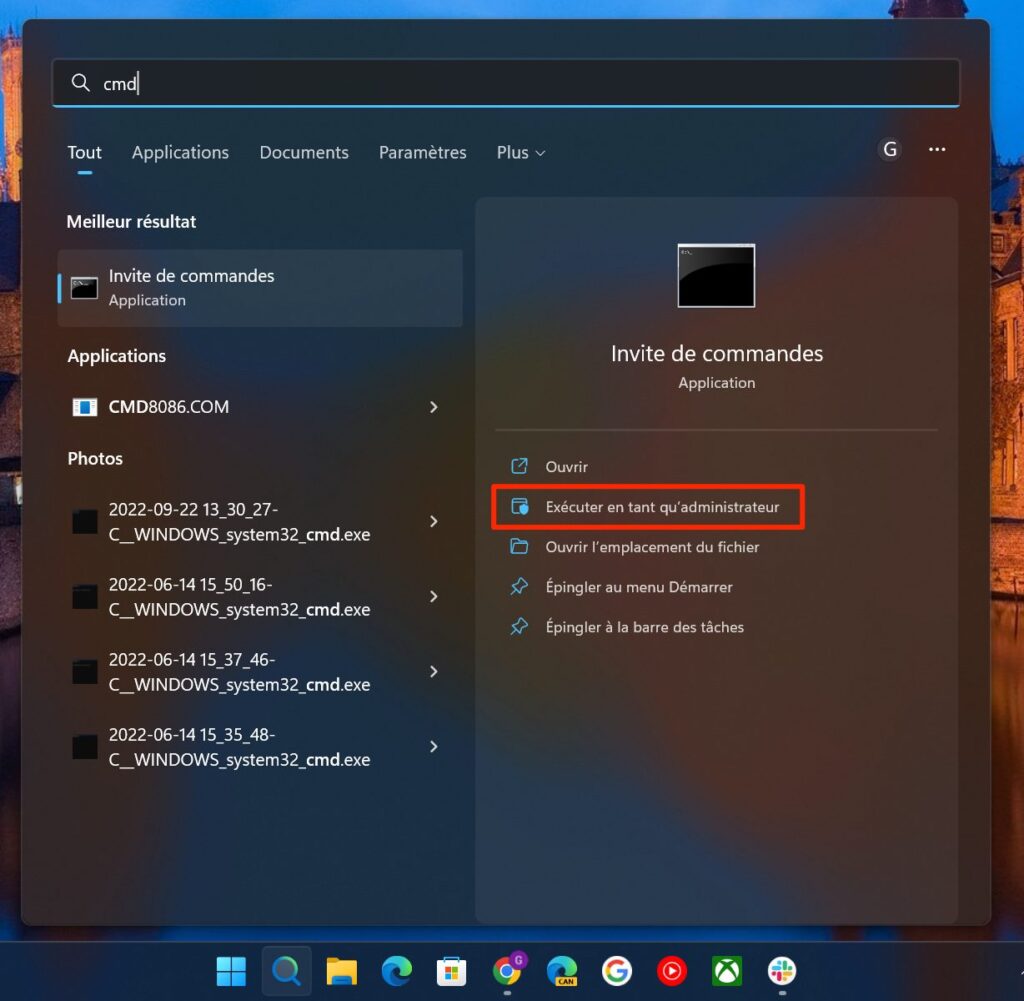
in the popup User Account Control which appears next, click yes.
3. Add a key to the registry
In the Command Prompt window that appears in front of you, copy and paste the following command and validate by pressing the key Enter keyboard:
reg added “HKCU\Software\Classes\CLSID\{86ca1aa0-34aa-4e8b-a509-50c905bae2a2}\inprocServer32” /f/ve

If all goes as expected, Command Prompt should show you the message “ The operation was successful “.
4. Restart your computer
For Windows 11 registry changes, here in this case, you need to add a new key and change its value Restart your computer.
After restarting, the old version should appear from the context menu, as was the case in Windows 10 (which you can usually get by clicking Show more options) by default when you right-click.

How do I go back?
However, if you want to go back, the process is completely reversible. To do this, in the Command Prompt window opened in Administrator mode (step 2), enter the command delete reg “HKCU\Software\Classes\CLSID\{86ca1aa0-34aa-4e8b-a509-50c905bae2a2}”/fand press the key Enter on the keyboard to confirm.
Restart your computer so deleting the registry key created in this way disappears and revives the context menu where it was originally supposed to appear in Windows 11.

“Hardcore beer fanatic. Falls down a lot. Professional coffee fan. Music ninja.”
More Stories
Parhelia – auditory canal
Ocean looks from the heart in a film discussion
The terrifying story behind the giant heart visible on Pluto's surface